How to write documents for Practical XML
Introduction
This is the ITM-TF version of a public domain xml processing package written by John Storrs. It aims to promote the wider use of xml for information capture and documentation. The ITM-TF has adopted this package for the publication of its websites. The package contains an xml parser, documentation generator, dtd generator, xml validator, with sample applications and associated xml documents. The applications include a simple tutorial which shows how easy it is to build and process an in-memory tree representing an xml document.
xml is a curate's egg of a standard, and the Practical XML project currently only handles the good bits. It focuses on the definition of hierarchical data structures using element and attribute markup. It handles the insertion of standard entities, but not user-defined entity definitions. Though it only covers a subset of the xml standard, the Practical XML package is useful in a wide range of applications.
The project software is written in Perl, an ideal language for text processing. The parser and system tools make extensive use of Perl regular expressions and other useful features of the language.
The package files are organised in 2 subdirectories: lib, containing the parser libraries, app containing system and demo applications.
Use
To use the Practical XML parser or applications on the ITM Gateway you need to set an environment variable PXML_HOME to point to ${SWITMDIR}/pracxml/app/publishxml. You also need to add konz/public/tex2im-1.8 to your path, for tex2im. Perl 5.8 or later is required. The pdf generator uses Latex as its output engine, so one of the current Tex/Latex packages is needed. The ImageMagick convert-6.0.0 or higher is needed for graphics conversion, and the graphviz package is used in a DocBook extension. The software tool requirements should be satisfied by any recent Linux distribution. Once you are set up you should be able to process Practical XML documents by running make in the itm/public/xml subdirectory. The results are placed in the html and pdf subdirectories.
Alternatively, you may set up your own personal testbed for PracticalXML (see PracticalXML Testbed). This allows you to develop and process xml based web pages and pdf documents on most Linux and Unix system. For more information see How to contribute to the ITM documentation websites.
Parser
The xml parser is in two perl modules: lib/LME/Xmlparser.pm and lib/LME/XmlNode.pm. It is an incremental parser, allowing memory-efficient processing of large xml files.
Applications
The app subdirectory contains system tools publishxml, generatedtd and validatedtd, some demo applications process*, and a coding tutorial. Example xml documents processed by the demo applications are in the doc subdirectory.
publishxml
This is a documentation generator for a core subset of DocBook, with some useful extensions. It currently generates html and pdf output. It has a clean, extensible design, and is much faster than some other open source Docbook tools.
generatedtd
This generates a dtd from a collection of xml documents expressing a single schema.
processtopics
processjournal, processtasks and processrecords are topic-based applications illustrating the transformation of a user-defined xml vocabulary to DocBook. A topic tree is defined using a simple xml vocabulary. This can be processed by processtopics to generate topic tree documentation. Other documents can structure their contents implicitly by reference to this tree.
processjournal
This processes a topic-based journal written in a simple vocabulary with embedded DocBook.
processrecords
This processes a topic-based structured document written in a simple vocabulary with embedded DocBook. PDF output is generated recursively for all levels in the topic hierarchy, making it easy to view any sub-tree of the document
processtasks
This processes a topic-based project task description, generating project management documentation.
DocBook
This document is an example of a Docbook article, which uses sections to structure its contents. Alternatively, the top level element could be a book. Books contain chapters, which in turn contain sections as shown here. You can organise document content in multiple files, using the include tag extension.
For information about Docbook, including online books, visit the 'official home page'. For the full DocBook tagset, see DocBook: The Definitive Guide. As you can see, DocBook is very big, with many specialised tags. PracticalXML covers only the commonly used features.
Sections
<section id="sectionId">
  <title>Section Title</title>
  <!-- section content comes here -->
</section>
Note the xml comment tags. The section id attribute is optional. You can use it on any tag to provide a target for an internal link. Id attributes must be unique in a document. See Links below.
You can nest sections. There are tags to support nesting (sect1, sect2, sect3, etc), but they offer no advantage over plain section.
There are two special classes of the <section> element which have to be used as the outermost element when defining a new XML file.
- class="topic": This section class defines a new html page. It also creates a section in the pdf version. Therefore, please complete it with a <title> element.
- class="import": This section class defines a mere import of the enclosed xml without the creation of a new html page. This is especially useful when the XML material shall be used in various locations of the website. No explicit section is created in the pdf version. A title element is therefore not required.
Paragraphs
<para>Paragraph 1 content.</para>
<para>Paragraph 2 content.</para>
Paragraph 1 content.
Paragraph 2 content.
Lists
Itemized (bullet) list:
<itemizedlist>
  <listitem>First item content.</listitem>
  <listitem>Second item content.</listitem>
</itemizedlist>
- First item content.
- Second item content.
Ordered (numbered) list:
<orderedlist>
  <listitem>First item content.</listitem>
  <listitem>Second item content.</listitem>
</orderedlist>
- First item content.
- Second item content.
Lists can be nested.
Tables
Table with title:
<table frame="sides">
  <title>Table Title</title>
  <tgroup cols="2">
    <colspec colwidth="30mm"/>
    <colspec colwidth="30mm"/>
    <thead>
      <row>
        <entry>column1 title</entry>
        <entry>column2 title</entry>
      </row>
    </thead>
    <tbody>
      <row>
        <entry>row1 column1 content</entry>
        <entry>row1 column2 content</entry>
      </row>
      <row>
        <entry>row2 column1 content</entry>
        <entry>row2 column2 content</entry>
      </row>
    </tbody>
  </tgroup>
</table>
| column1 title | column2 title |
|---|---|
| row1 column1 content | row1 column2 content |
| row2 column1 content | row2 column2 content |
The table above was generated without the top and bottom lines using the frame attribute (here set to "sides"). The allowed values for this attribute are all, bottom, none, sides, top and topbot following the DocBook definitions.
Complex table with multicolumn and multirow spans:
<informaltable frame="all">
  <tgroup cols="4">
    <colspec colnum="1" colname="c1" colwidth="30mm"/>
    <colspec colnum="2" colname="c2" colwidth="30mm"/>
    <colspec colnum="3" colname="c3" colwidth="30mm"/>
    <colspec colnum="4" colname="c4" colwidth="30mm"/>
    <thead>
      <row>
        <entry morerows="1">header multirow1</entry>
        <entry morerows="1">header multirow2</entry>
        <entry namest="c3" nameend="c4">header multicolumn</entry>
      </row>
      <row>
         <entry colname="c3">subcolumn1</entry>
         <entry colname="c4">subcolumn2</entry>
      </row>
    </thead>
    <tbody>
      <row>
         <entry morerows="2">body multirows</entry>
         <entry>body column2</entry>
         <entry morerows="1">body multirows</entry>
         <entry>body column4</entry>
      </row>
      <row>
         <entry>body column2</entry>
         <entry>body column4</entry>
      </row>
      <row>
         <entry namest="c2" nameend="c4">body multicolumn</entry>
      </row>
    </tbody>
  </tgroup>
</informaltable>
| header multirow1 | header multirow2 | header multicolumn | |
|---|---|---|---|
| subcolumn1 | subcolumn2 | ||
| body multirows | body column2 | body multirows | body column4 |
| body column2 | body column4 | ||
| body multicolumn | |||
For a table without a title, use informaltable which is otherwise the same. Specify column widths in mm. For more information on tables in DocBook please consult DocBook XSL: The Complete Guide.
Table with rows with alternating colours but without lines:
<table alternating="yes" rules="none">
  <title>Alternating Table</title>
  <tgroup cols="2">
    <colspec colwidth="60mm"/>
    <colspec colwidth="60mm"/>
    <thead>
      <row>
        <entry>column1 title</entry>
        <entry>column2 title</entry>
      </row>
    </thead>
    <tbody>
      <row>
        <entry>row1 column1 content</entry>
        <entry>row1 column2 content</entry>
      </row>
      <row>
        <entry>row2 column1 content</entry>
        <entry>row2 column2 content</entry>
      </row>
      <row>
        <entry>row3 column1 content</entry>
        <entry>row3 column2 content</entry>
      </row>
      <row>
        <entry>row4 column1 content</entry>
        <entry>row4 column2 content</entry>
      </row>
      <row>
        <entry>row5 column1 content</entry>
        <entry>row5 column2 content</entry>
      </row>
      <row>
        <entry>row6 column1 content</entry>
        <entry>row6 column2 content</entry>
      </row>
    </tbody>
  </tgroup>
</table>
| column1 title | column2 title |
|---|---|
| row1 column1 content | row1 column2 content |
| row2 column1 content | row2 column2 content |
| row3 column1 content | row3 column2 content |
| row4 column1 content | row4 column2 content |
| row5 column1 content | row5 column2 content |
| row6 column1 content | row6 column2 content |
For a table without internal lines set the rules attribute to "none". If not set, the attribute defaults to "all" which draws all internal lines. Do not use rules="none" together with multicolumns or multirows! To build a table with alternating row colours set the attribute alternating to "yes". Leaving out this attribute or setting it to any other value will produce a table without row colours.
Graphics
<graphic fileref="../graphics/itm_viewlog1.png" width="70%"/>
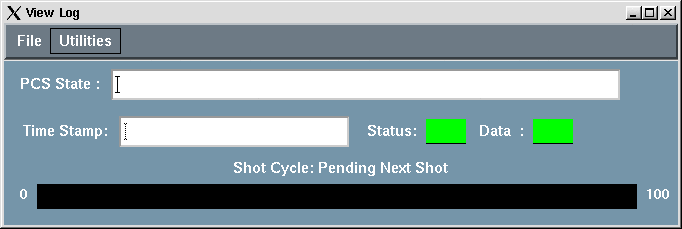
Image size is controlled by specifying the width relative to the page width in percent.
Links are always relative to the file location!
Links
Link to document on the Web:
For the full DocBook tagset, see
<ulink url="http://www.docbook.org/tdg/en/html/docbook.html">
DocBook: The Definitive Guide</ulink>.
For the full DocBook tagset, see DocBook: The Definitive Guide.
Link to an email address:
Author:
<ulink url="mailto:john.storrs@ukaea.org.uk">John Storrs</ulink>.
Author: John Storrs.
Link to another document on the local server:
Here is the <ulink url="../imports/style.css">style sheet</ulink> for this document.Here is the style sheet for this document.
Links are always relative to the file location!
Links within the ITM website
The automatic html/pdf generator engine allows for a sophisticated system
of links within the ITM website.
Targets for links within the ITM website may be any
<section>, <para>, or
<anchor> tags which have an "id" attribute
.
Examples:
<section id="target1">
<para id="target2">
<anchor id="target3"/>
The <anchor> tag is a "silent" target which has no content of its own and only serves as a target for links.
Some special rules apply:
Every standalone xml document must start with a <section class="topic" id="..."> or a <section class="import" id="..."> tag. These tags have to have the "id" attribute. The "class" attribute must come first. Only double quotes are allowed.
Do NOT put <section>, <para>, or <anchor> on the same line.
A link is then created by using the <link> tag with the "linkend" attribute to specify the target (see example below).
This links to the <link linkend="sectionId">Sections</link> section above.This links to the Sections section above. The id attributes must be unique in a document.
The Perl/Python engine will generate the appropriate links in the html and pdf versions of the website. If a link target lies outside a pdf document (for instance because only a part of the website was converted into pdf), the engine automatically creates an external link to the correct web address on the ITM server. By this, even for the pdf of a part of the website all links are fully functional.
The web addresses of external links appear in full as footnotes in the pdf.
Verbatim
<screen>
This is verbatim layout
   It is typeset in a fixed-width font.
      Spacing is preserved.
</screen>
results in
This is verbatim layout
   It is typeset in a fixed-width font.
      Spacing is preserved.
If the verbatim content includes the special xml characters '<' or '>'
(eg xml text or program code), they must be replaced by '<'
and '>'. Please be careful when using the verbatim
environment inside other environments, i.e. elements.
Do not use <screen> elements inside <box>
elements!
DocBook Extensions
DocBook extensions provided in Practical XML include:
File Inclusion
Simple xml file inclusion is achieved like this:
<include file="introduction.xml"/>
<include file="developmenttools.xml"/>
<include file="hardware.xml"/>
<include file="firmware.xml"/>
<include file="software.xml"/>
<include file="hardwaretesting.xml"/>
<include file="softwareupdates.xml"/>
The included xml file must have a <section> element with a class attribute as its root element. There are two special classes of the <section> element.
- class="topic": This section class defines a new html page. It also creates a section in the pdf version. Therefore, please complete it with a <title> element.
- class="import": This section class defines a mere import of the enclosed xml without the creation of a new html page. This is especially useful when the XML material shall be used in various locations of the website. No explicit section is created in the pdf version. A title element is therefore not required.
Important:
Do NOT create circular inclusions!
Maths
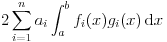
Latex maths can be embedded in DocBook documents in a math element. Here are some examples:
<math>\[ 2\sum_{i=1}^n a_i \int^b_a f_i(x)g_i(x)\,\mathrm{d}x \]</math>
produces this:
 and this:
<math>$$ 2\sum_{i=1}^n a_i \int^b_a f_i(x)g_i(x)\,\mathrm{d}x $$</math>
produces this:

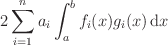
To get a better alignment for inline maths, use the <inmath> element.
<inmath>\[ 2\sum_{i=1}^n a_i \int^b_a f_i(x)g_i(x)\,\mathrm{d}x \]</inmath>
produces this:
Here are some more inline maths:
 and
and
 .
.
Text Formatting
The standard set of text formatting elements, like bold face, italic,
and underline have been added to the DocBook scope.
<bold>This is bold face.</bold>results in
This is bold face.
<italic>This is italic.</italic>results in
This is italic.
<underline>This is underlined text.</underline>results in
This is underlined text.
Text Colors
A total of 10 text colors have been added to the DocBook definitions. The
<color> tag carries the attribute name which allows
specification of the text color by name (see table below).
| source | result |
|---|---|
| <color name="black">text color is black</color> | text color is black |
| <color name="red">text color is red</color> | text color is red |
| <color name="gray">text color is gray</color> | text color is gray |
| <color name="blue">text color is blue</color> | text color is blue |
| <color name="pink">text color is pink</color> | text color is pink |
| <color name="cyan">text color is cyan</color> | text color is cyan |
| <color name="green">text color is green</color> | text color is green |
| <color name="gold">text color is gold</color> | text color is gold |
| <color name="sienna">text color is sienna</color> | text color is sienna |
| <color name="orange">text color is orange</color> | text color is orange |
| <color name="goldenrod">text color is goldenrod </color> | text color is goldenrod |
| <color name="lightgreen">text color is lightgreen </color> | text color is lightgreen |
| <color name="purple">text color is purple </color> | text color is purple |
Boxes
<box>
This environment frames the included text with a box. It is a mandatory
alternative to <screen> if a <math> element is included.
</box>
| This environment frames the included text with a box. It is a mandatory alternative to <screen> if a <math> element is included. Do not use a <screen> element inside a box environment! Rather stack <box> elements. |
Special Characters
Special characters like diacritics have been added to the
DocBook scope. If you like to use diacritics in xml, please use the
html entities, i.e. é for é.
For a complete list of diacritics please see
HTML:Special
Characters. Only the diacritics have been included so far.
Blanks
Neither XML nor HTML maintain blanks inside a document but rather condense all whitespaces into single blanks. If you like to deliberately add blanks to your document (html and pdf), you will have to use either the <screen> environment or the <spaces number="..."/> tag. Its "numer" attribute specifies the number of blanks you would like to insert.Example:
no spaces<newline/>
<spaces/>1 space<newline/>
<spaces number="1"/>1 space<newline/>
<spaces number="2"/>2 spaces<newline/>
<spaces number="3"/>3 spaces<newline/>
<spaces number="4"/>4 spaces<newline/>
<spaces number="5"/>5 spaces<newline/>
<spaces number="10"/>10 spaces<newline/>
produces the following:
no spaces
1 space
1 space
2 spaces
3 spaces
4 spaces
5 spaces
10 spaces
last update: 2013-03-04 by dpc